
Appearance
Your First Endpoint
Endpoints in AireGlu are where the magic happens. At the most basic level they accept data, then do something with it. This could be as simple as sending an email, or as a complex multi-system processing task.
Step 1: Configure Your Endpoint Settings
First, navigate to the Endpoints section using the top menu, and click "Create Endpoint" to begin setting up a new endpoint. The editor breaks the process into three simple steps: Settings, Tasks, and Publish. We're currently in the first step where we'll configure the basic settings for our endpoint.
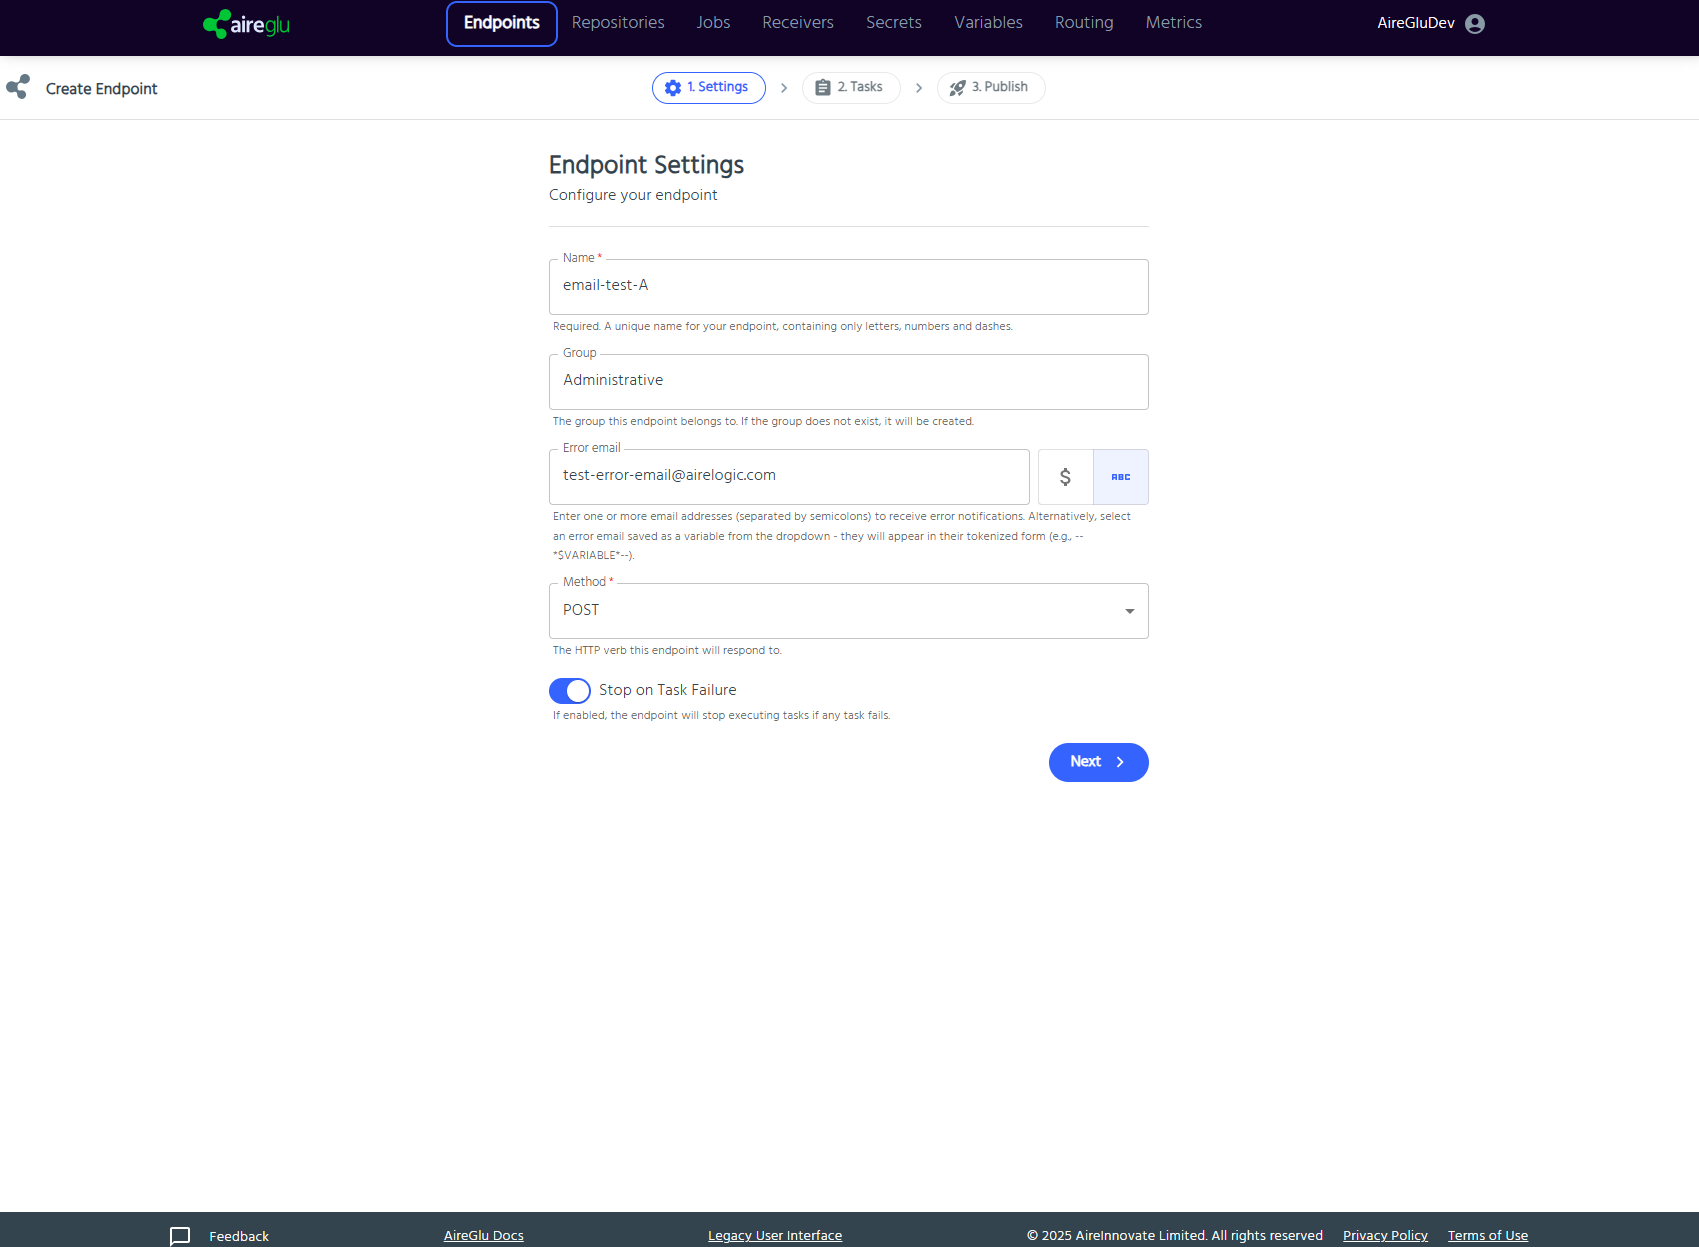
Start by giving your endpoint a name. This is important as it will be used in the URL for your endpoint. Enter "email-test-A" in the Name field. Remember that endpoint names should contain only letters, numbers, and dashes.
Next, you can assign your endpoint to a Group. For organisation purposes, we'll put this in the "Administrative" group. If this group doesn't exist yet - AireGlu will create it automatically.
For error handling, enter an email address where you'd like to receive notifications if something goes wrong with your endpoint. You can enter "test-error-email@airelogic.com" or your own email address. The Method field is already set to "POST" which is perfect for our example. This determines how external applications will send data to your endpoint.
Finally, you can decide whether you want the endpoint to stop executing tasks if any task fails by toggling the "Stop on Task Failure" option. For now, we'll leave this disabled. When you're ready, click the blue "Next" button in the bottom right to continue to the Tasks configuration.
Step 2: Configure Tasks
Now you've moved to the Tasks screen, which is where you'll define what your endpoint will do. You'll notice that your endpoint already starts with two essential nodes: Authentication and Input.
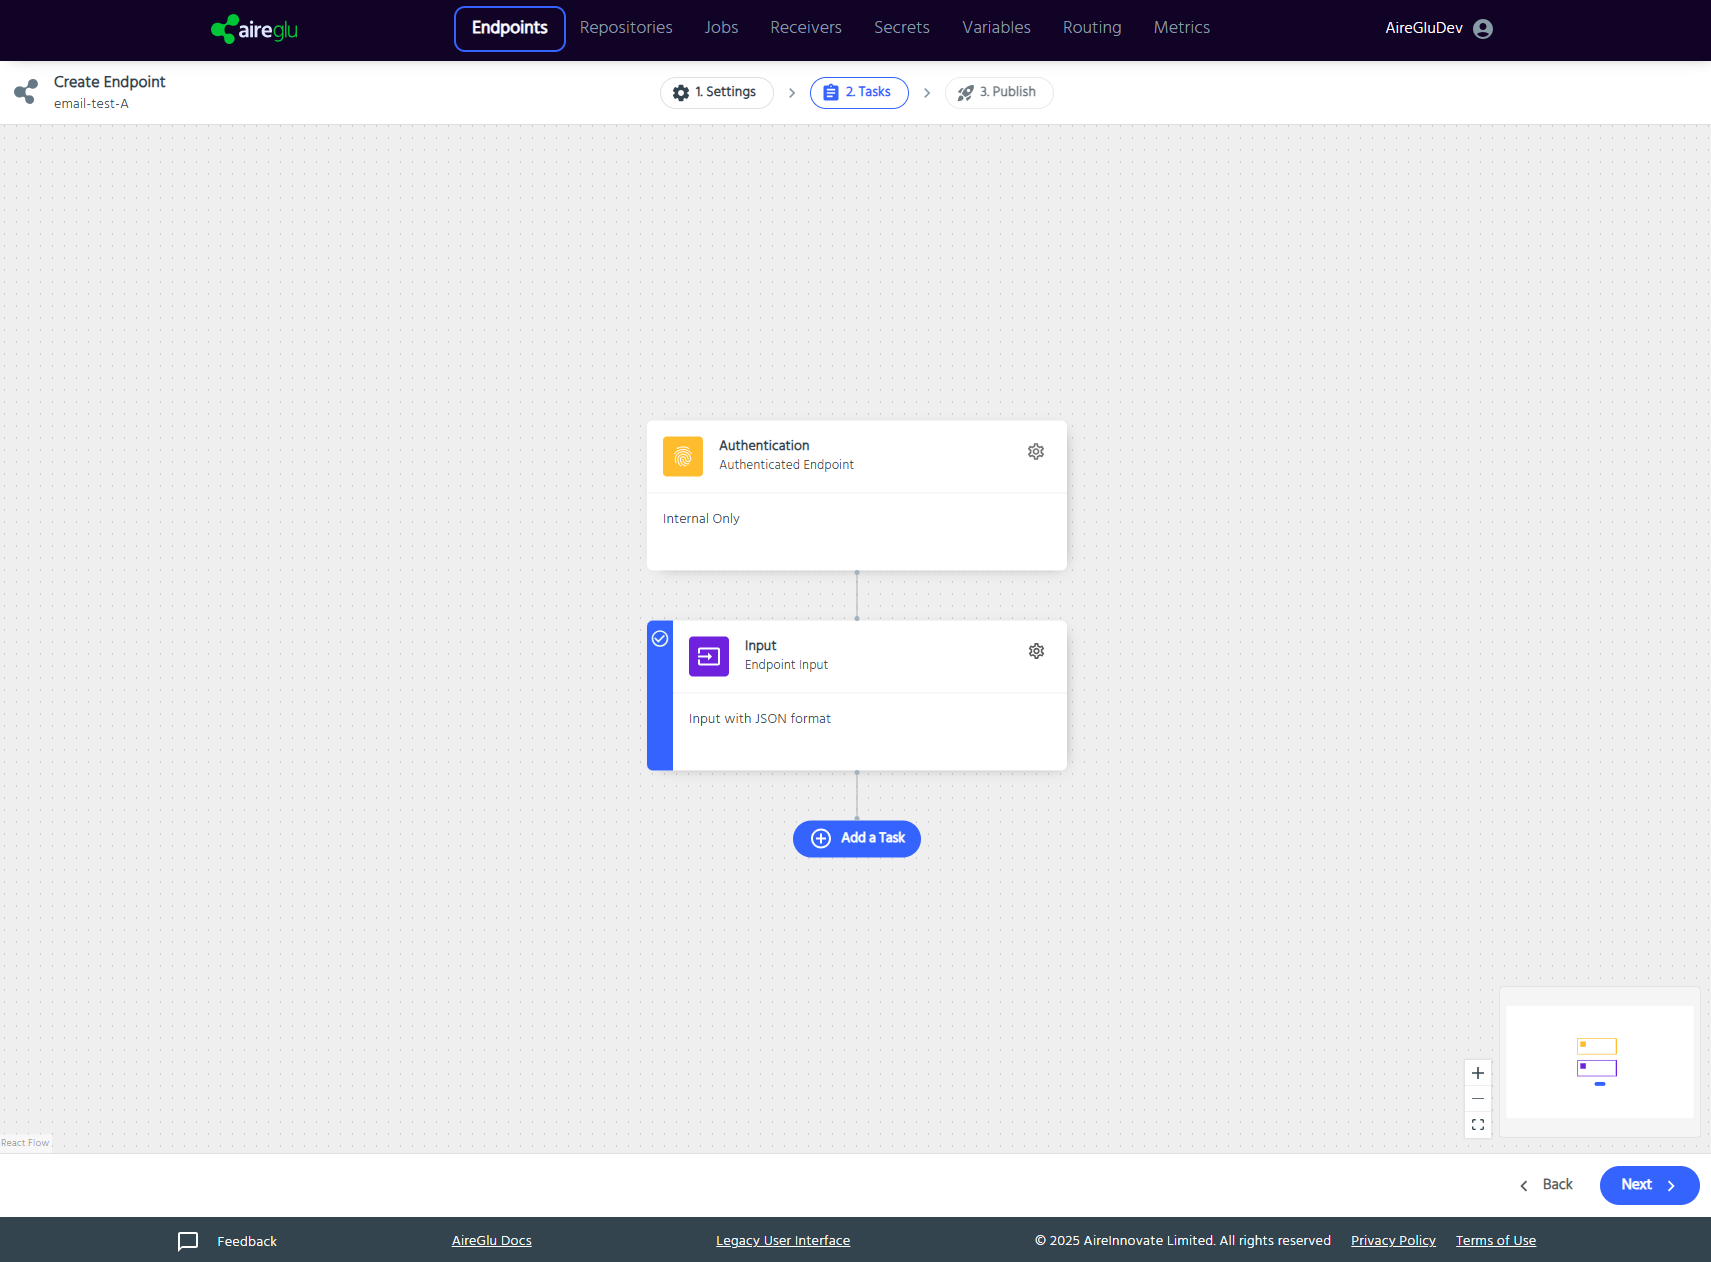
Authentication Node
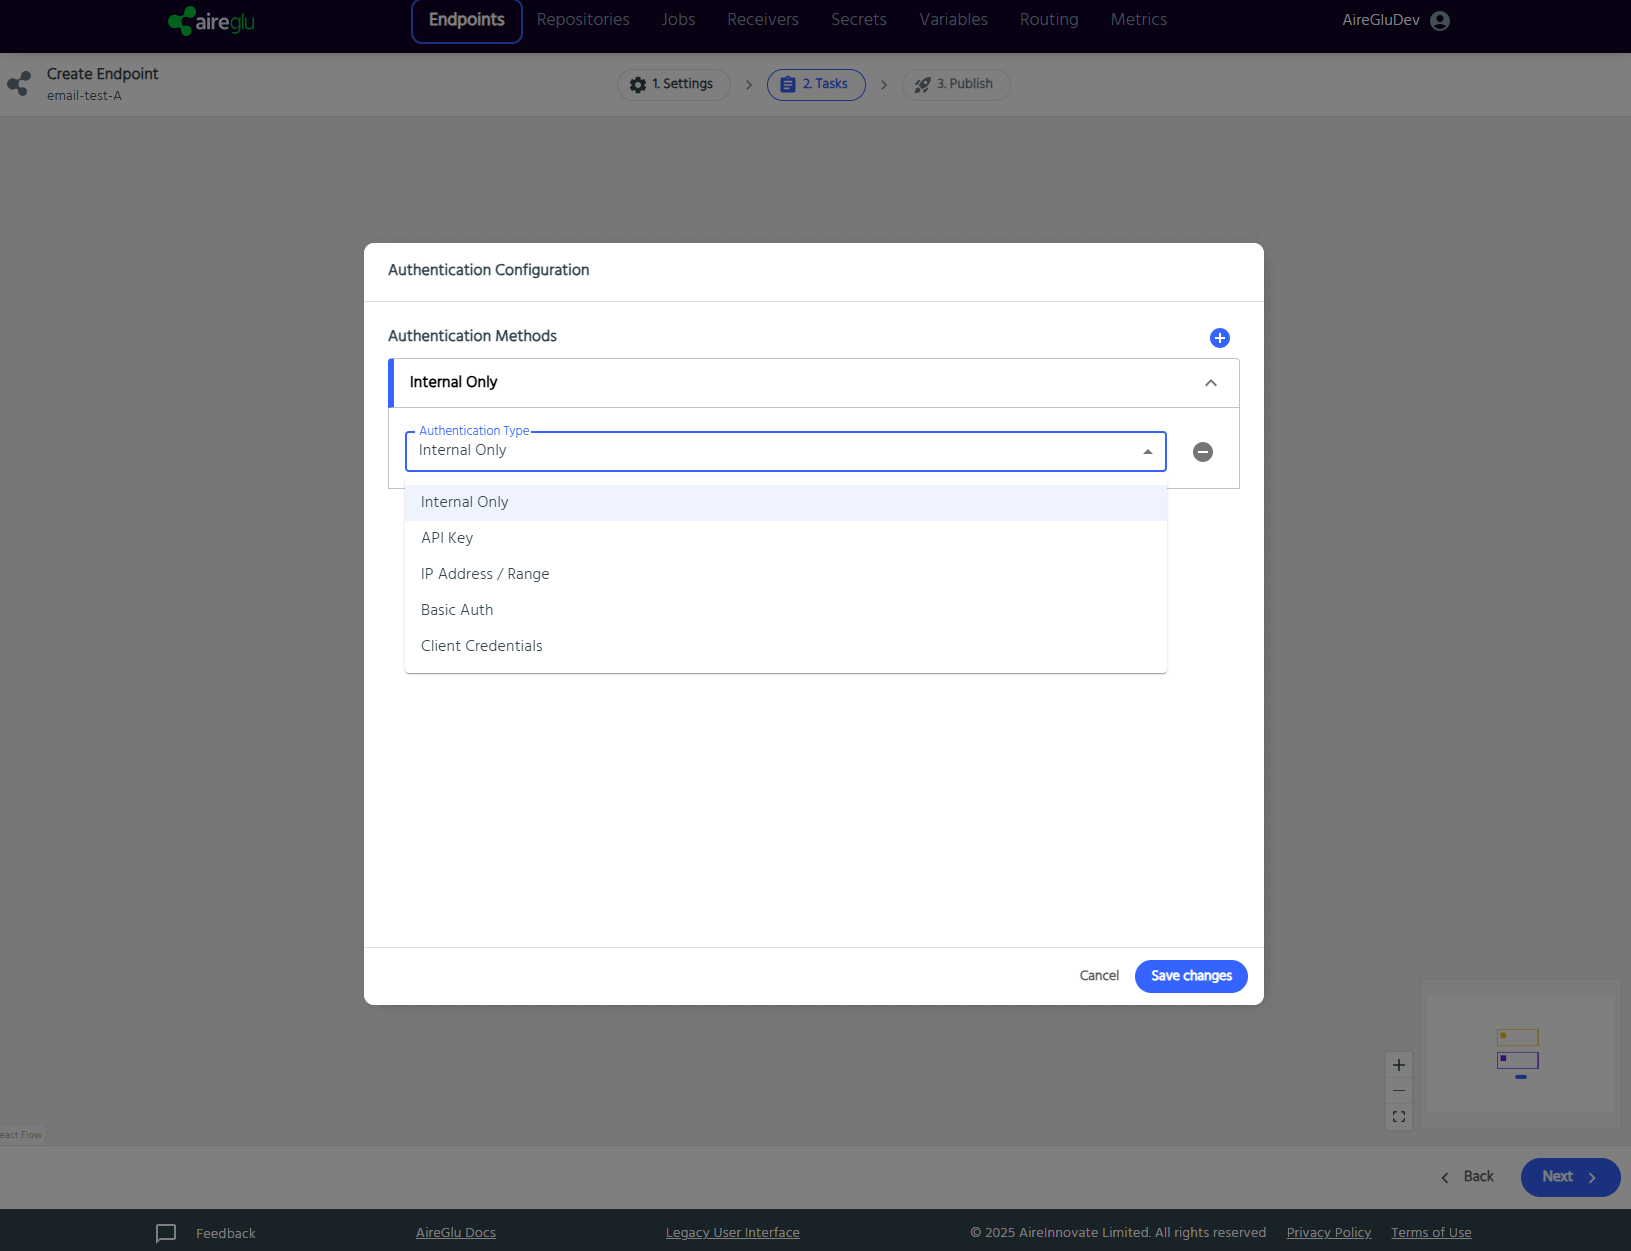
Every endpoint begins with an Authentication node. This controls who can access your endpoint and how they authenticate. For our simple email example, we'll use "Internal Only" authentication. Click on the cog icon next to the Authentication node to access its settings, select "Internal Only" from the dropdown, and click "Save changes".
For more complex authentication options, check out the Endpoint Authentication section in our documentation.
Input Node
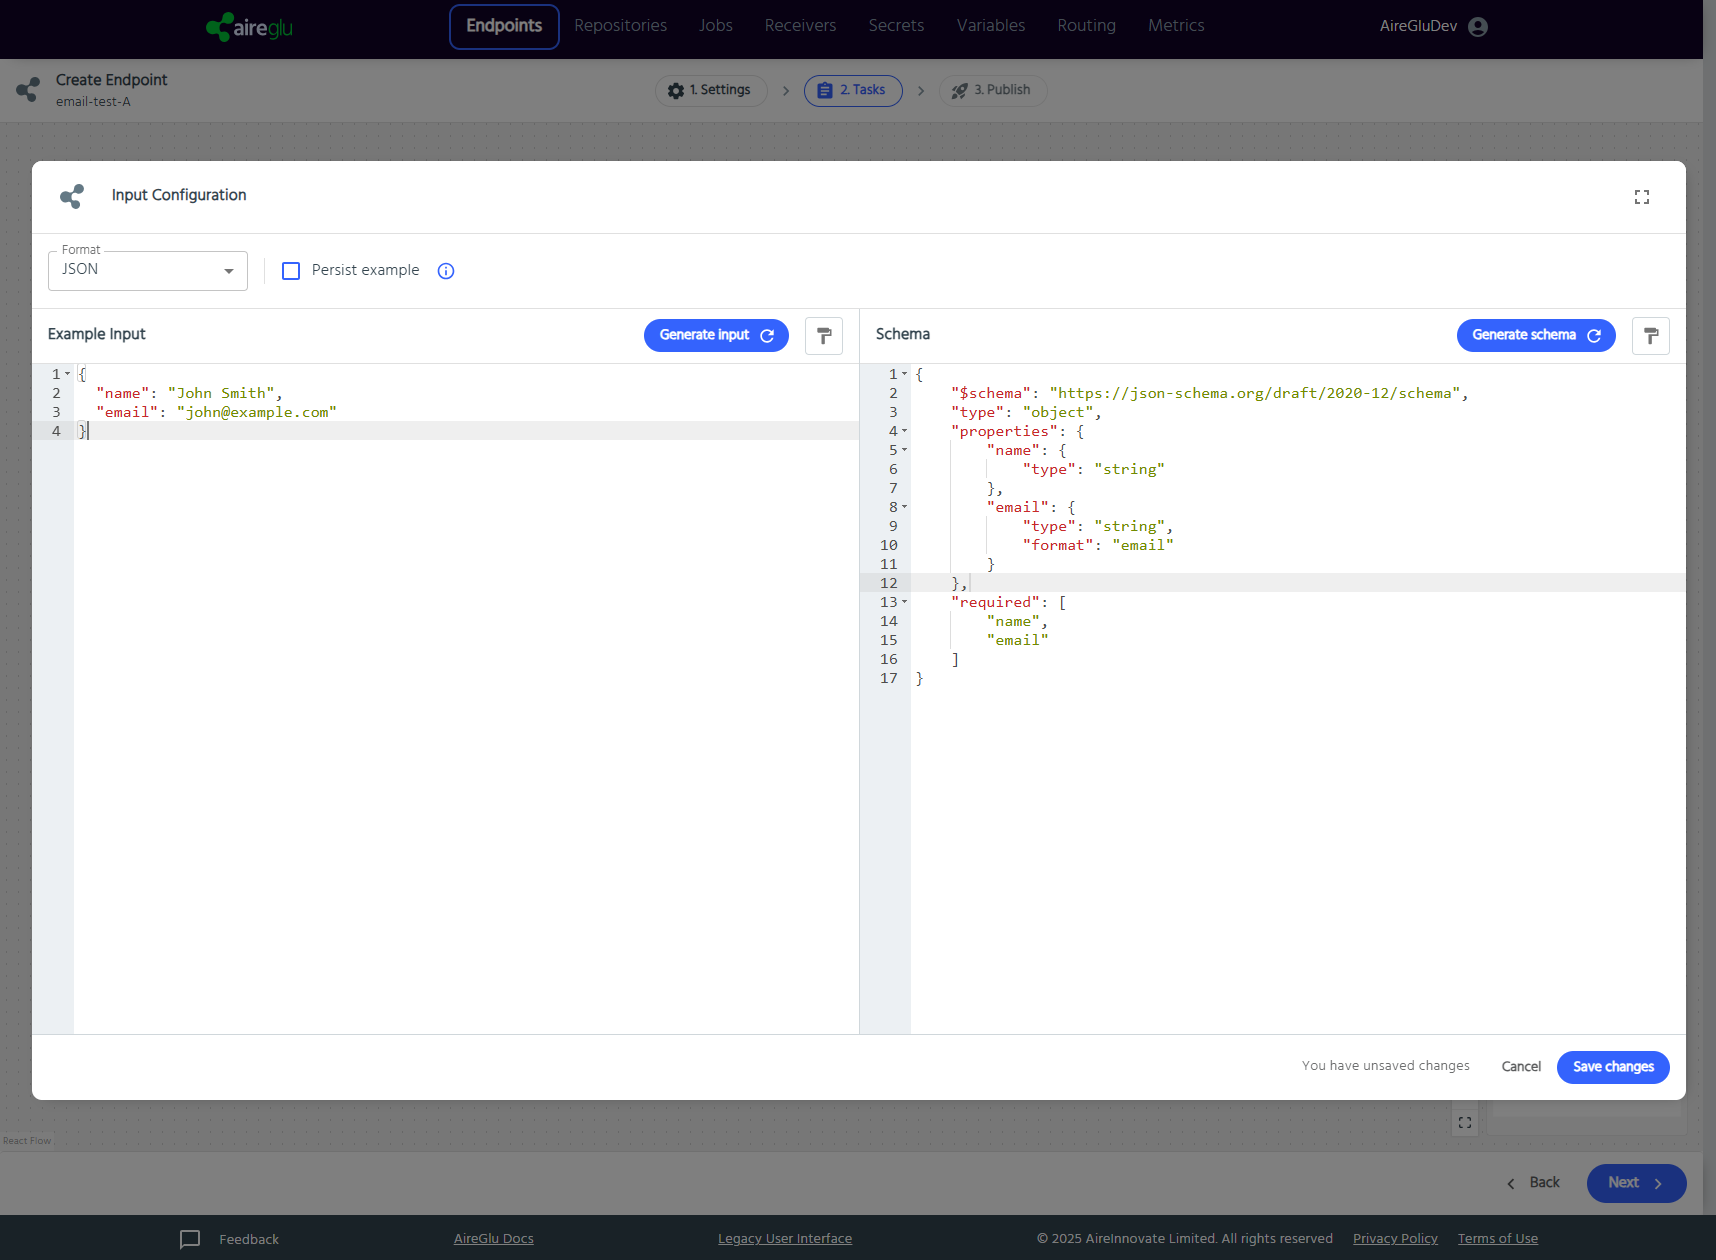
The Input node defines the structure of the data that your endpoint expects to receive. Click on the cog icon next to the Input node to configure it.
In the Input Configuration dialog, select the "JSON" format. Now let's define the structure of our input data by providing an example. In the Example Input panel on the left, enter this simple JSON structure:
json
{
  "name": "John Smith",
  "email": "john@example.com"
}
The right panel shows the JSON Schema that will validate incoming data to ensure it matches your expected format. You can click "Generate schema" to automatically create a schema based on your example input. This ensures that when your endpoint is called, the data will be properly validated before processing.
Once you're happy with your input configuration, click "Save changes".
Adding a Task
Now that our endpoint has authentication and knows what input to expect, we need to add a task that will do something with this data. Click the "Add a Task" button at the bottom of the workflow diagram.
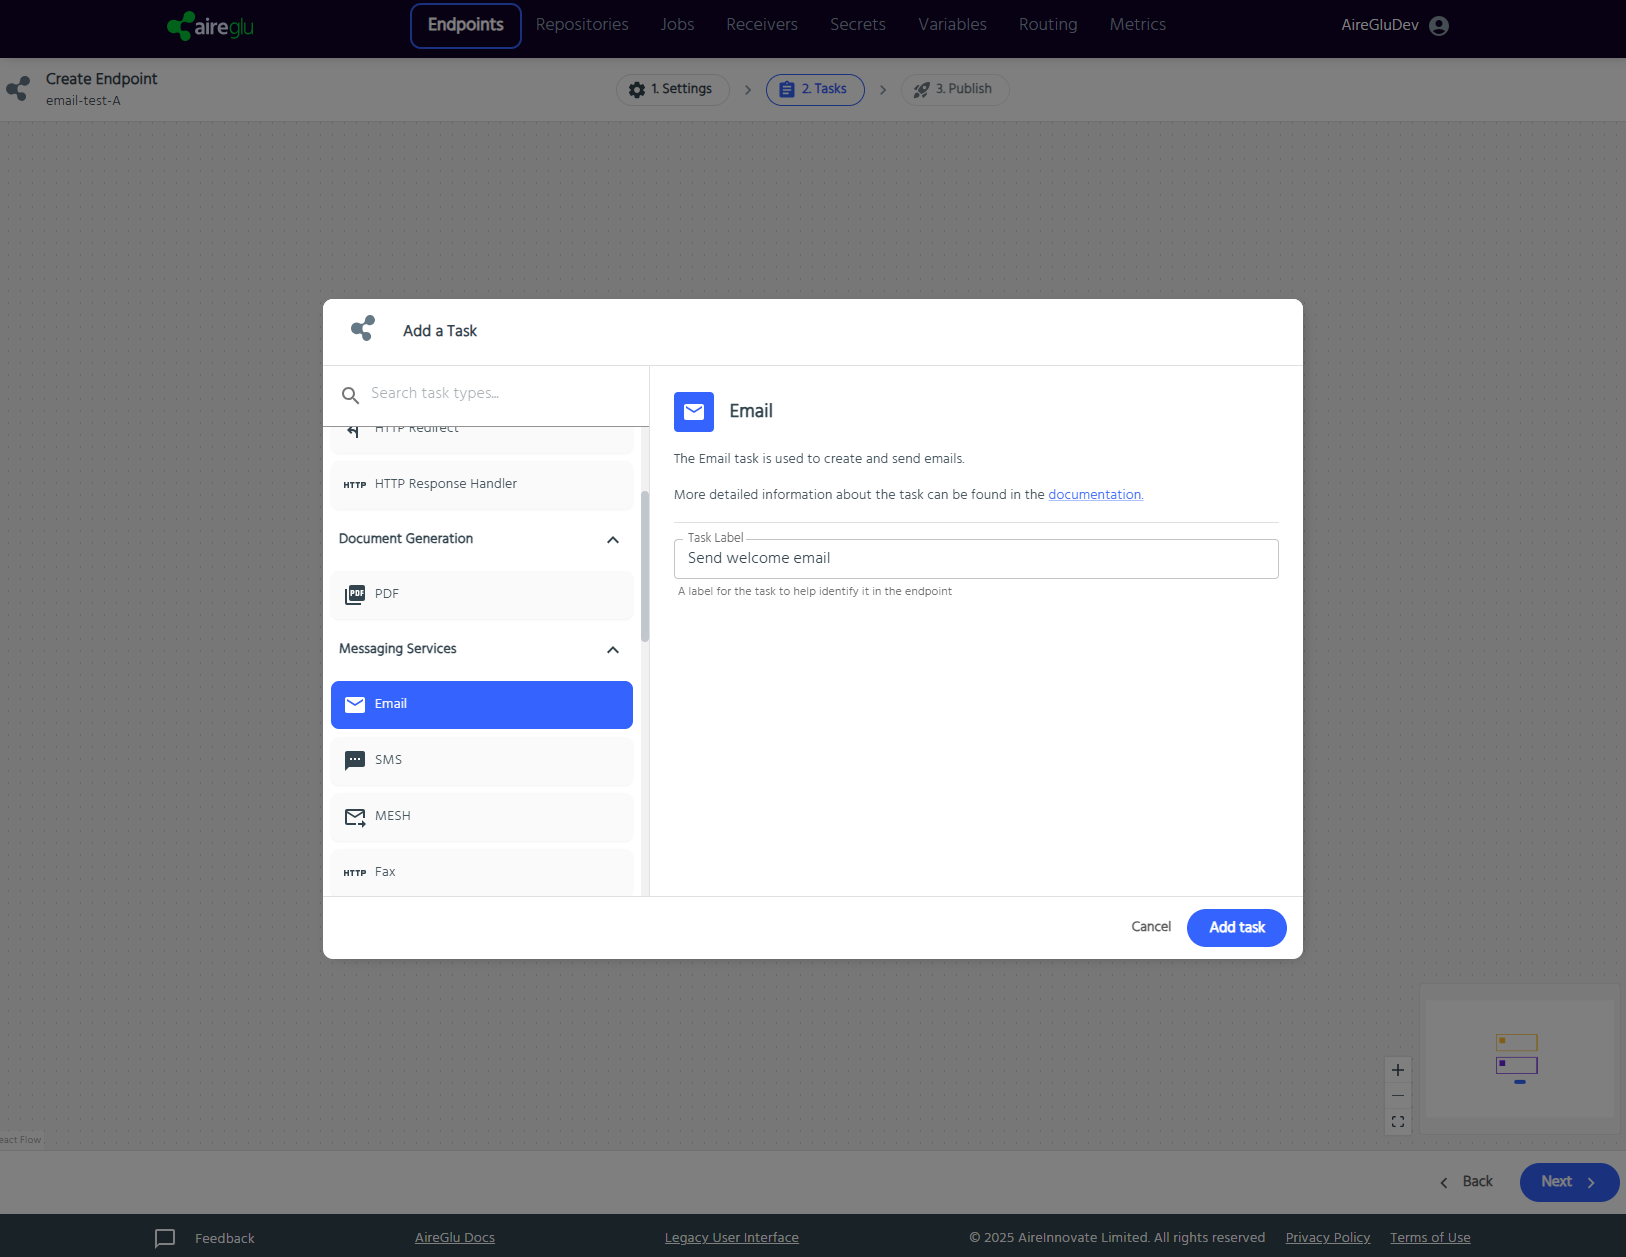
After clicking "Add a Task", you'll see the task selection panel. This is where you choose what action your endpoint will perform. For our example, we want to send an email. In the task selection panel, you can either:
- Scroll through the categories on the left to find "Messaging Services" and select "Email"
- Or simply click the "Email" task card shown in the main area
- You can also use the search box at the top to quickly find specific task types
The Email task is used to create and send emails based on the data your endpoint receives. If you want to learn more about any task's capabilities, you can click the "documentation" link shown in the task details.
Give your task a descriptive label to help identify it in your endpoint workflow. For this example, you could enter "Send welcome email" in the Task Label field.
When you're satisfied with your selection, click the "Add task" button at the bottom right to add this task to your endpoint workflow. For detailed information about all available tasks and their specific configuration options, check out the Tasks section in our documentation.
Setting Up Your Email Task
After adding the Email task, you'll see your workflow taking shape. Your endpoint now has a complete flow: Authentication → Input → Send Welcome Email.
The workflow is displayed from top to bottom, showing the exact order in which tasks will execute when your endpoint is called. Notice that your newly added Email task has a small ellipsis icon on the left side, indicating that it needs configuration before it can work properly. To manage your tasks, you have several options available:
- Click the pencil icon to edit the task label
- Use the up and down arrows to reorder tasks if you have multiple tasks
- Click the trash icon to delete a task
- Use the plus button between tasks to insert new tasks at specific points in the workflow

Now it's time to configure our Email task. Click on the cog icon next to the "Send Welcome Email" task to open its configuration panel. When you have more complex endpoints with multiple tasks, this visual workflow makes it easy to understand the flow of data and the sequence of operations. You can add as many tasks as needed to accomplish your goal, creating powerful multi-step processes.
Configuring Your Email Task
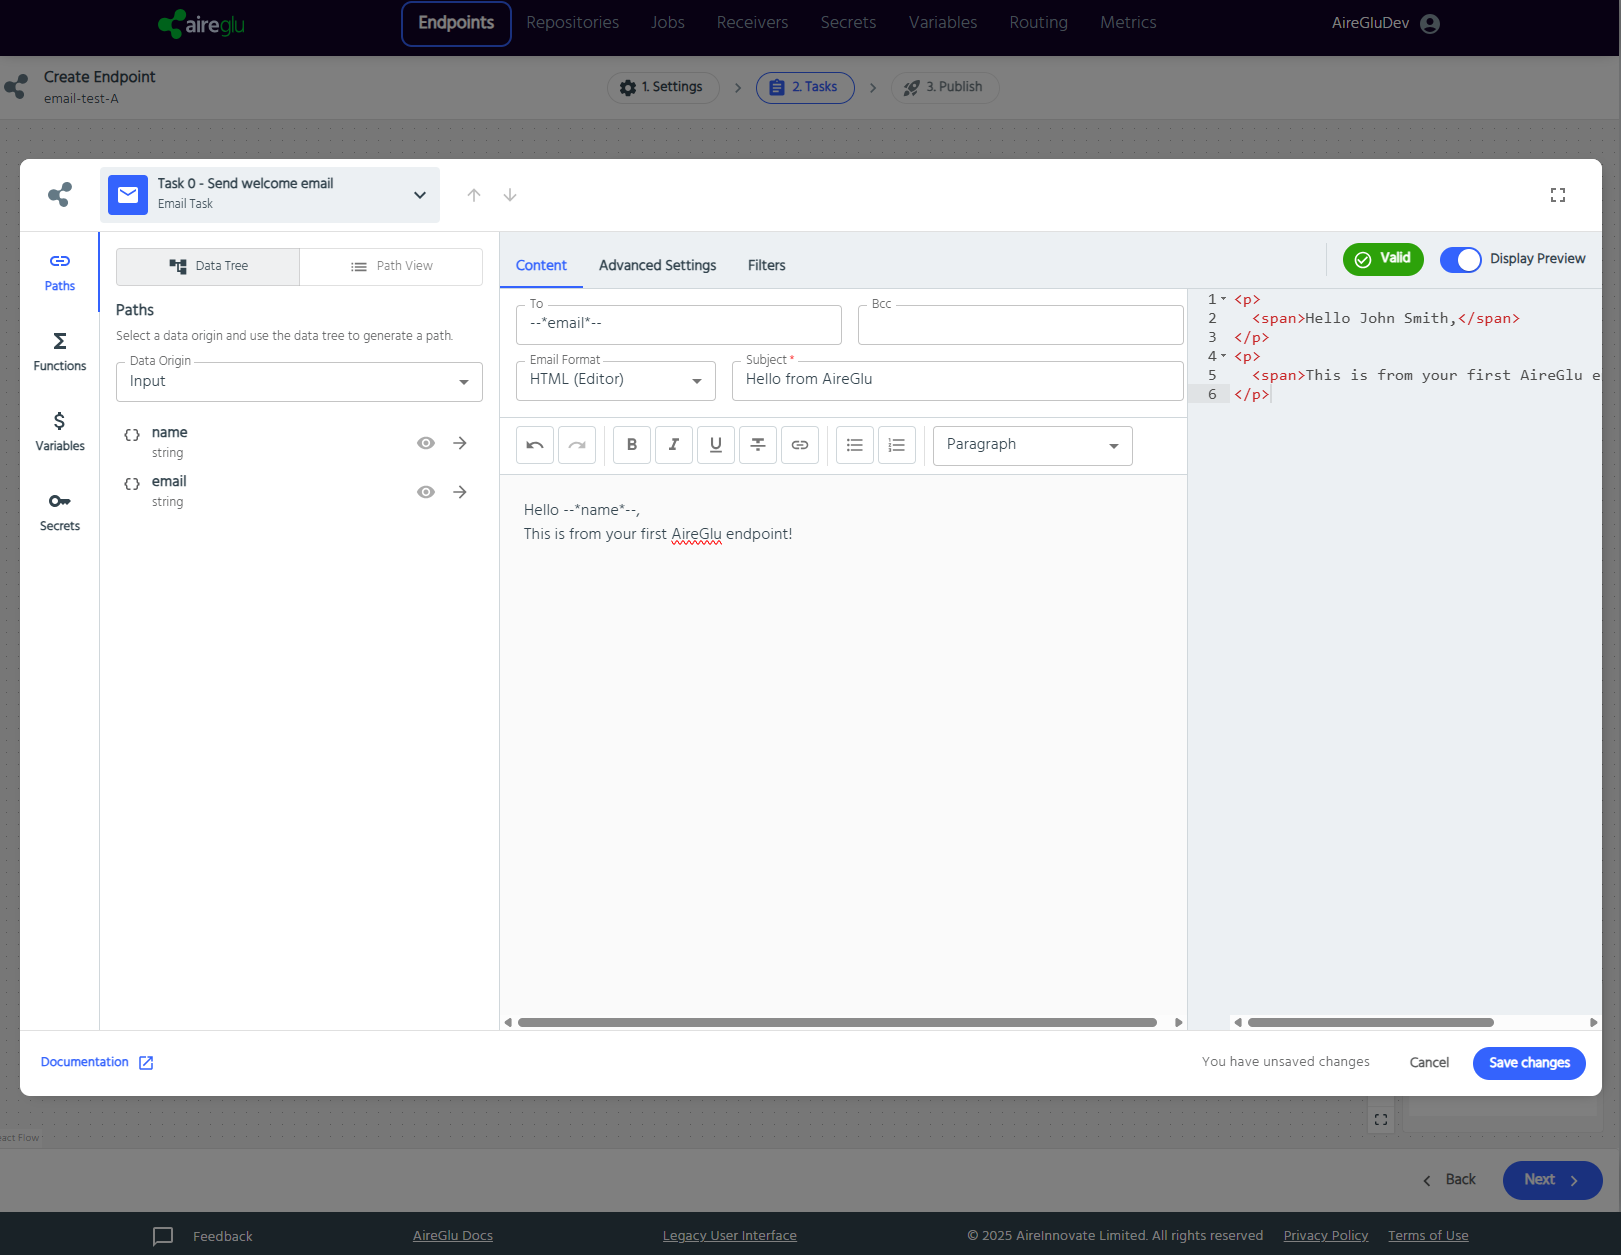
Now it's time to set up the details of your email message. The task configuration panel gives you complete control over how your email will look and what data it will contain.
On the left side of the panel, you'll see the Paths section which shows what data is available from previous steps in your workflow. Since we defined our input with "name" and "email" fields, these are now available to use in your email.
Here's how to configure the email:
Set the recipient: Click in the "To" field, then use the data mapping feature by clicking the arrow next to "email" in the Paths section. This inserts
--*email*--into the field, which will be replaced with the actual email address from your input data when the endpoint runs.Add a subject: Enter "Hello from AireGlu" in the Subject field.
Select format: Keep "HTML (Editor)" selected in the Email Format dropdown if you want to use formatting in your email.
Compose your message: In the email body editor, create a simple message:
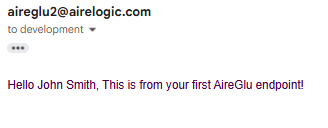
Hello --*name*--,
This is from your first AireGlu endpoint!
The right side of the screen shows a preview of how your email will look when it's sent, with the template variables replaced with example values from your input data.
For more advanced options, you can explore the "Advanced Settings" and "Filters" tabs at the top of the configuration panel. When you're satisfied with your email configuration, click "Save changes" to apply your settings.
For detailed information about all email task options and more advanced templating features, check out the Documentation link at the bottom of the configuration panel.
Once you're happy with your task setup, click "Save changes" and you'll be taken back to the workflow diagram.
Step 3 Publish Your Endpoint
Now that you've configured your email task, it's time to publish your endpoint. Click the "Next" button at the bottom right to proceed to the Publish step.
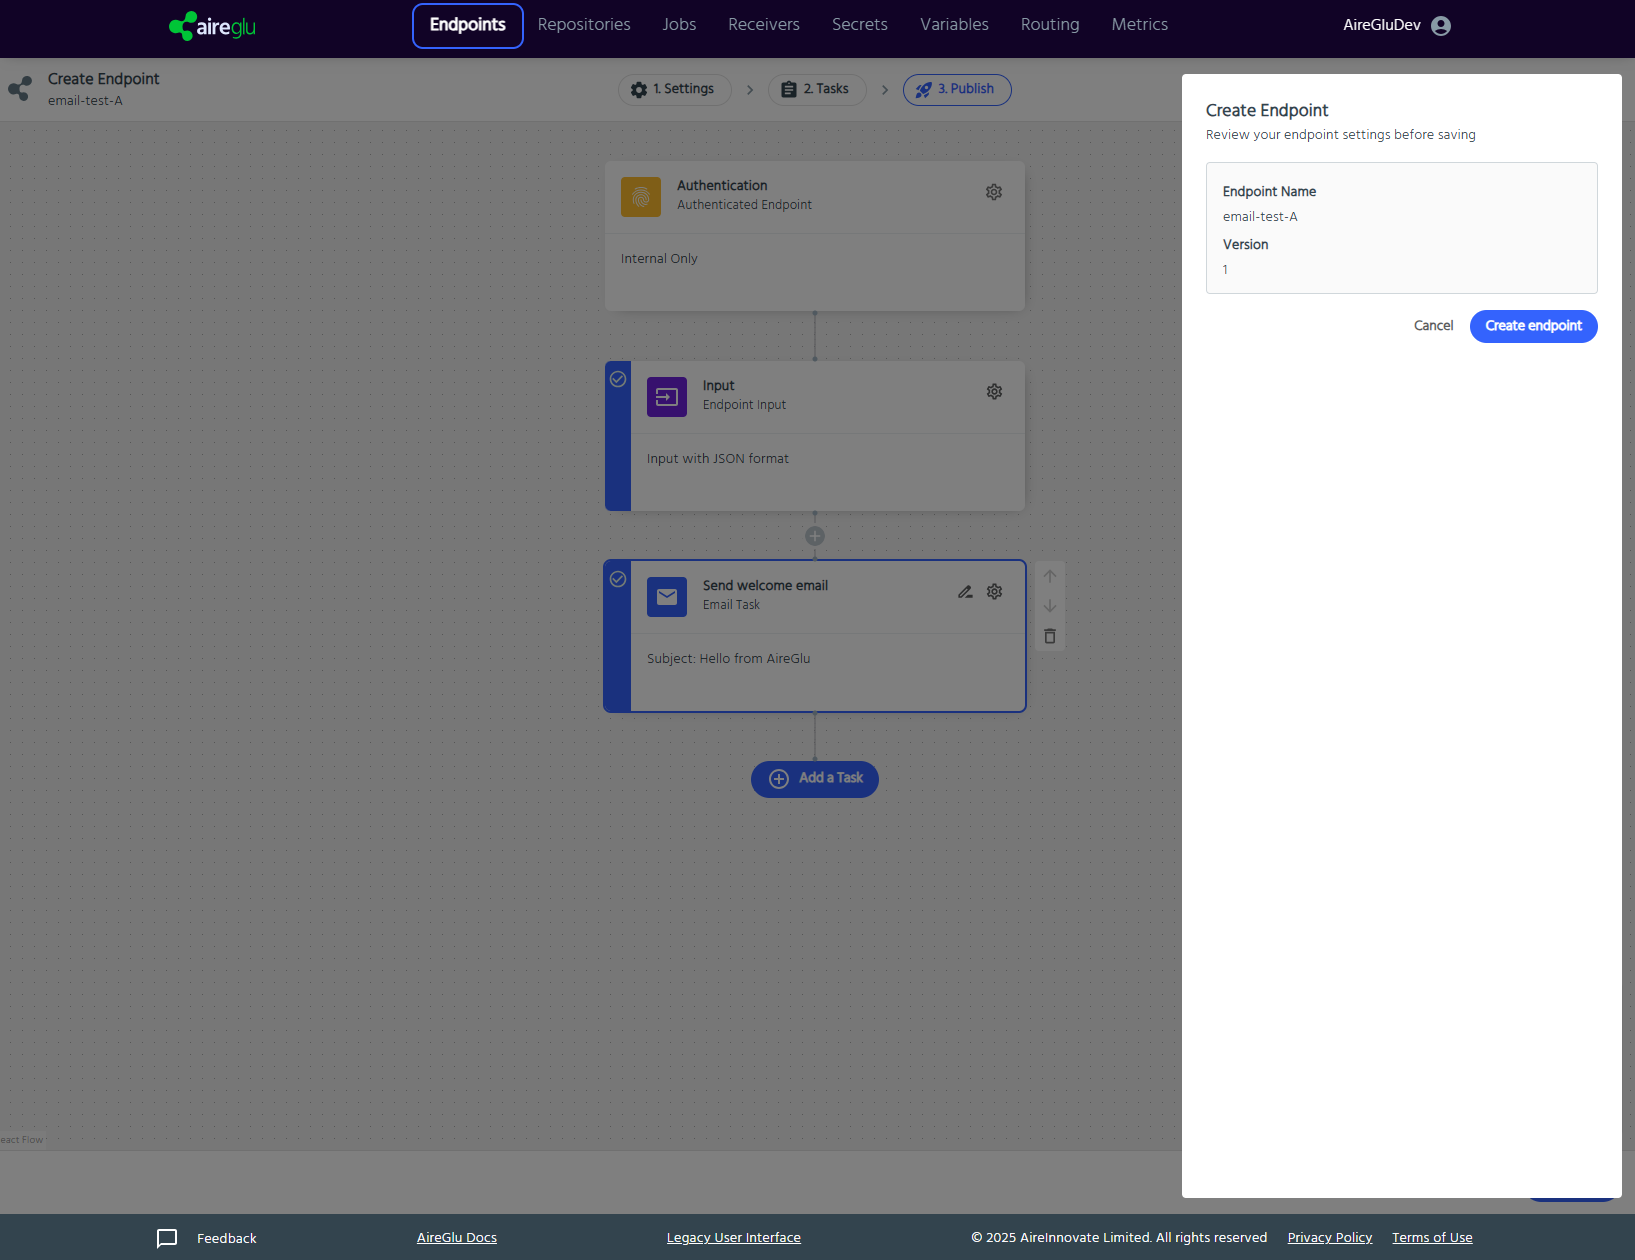
Review and Create
In the final step, you'll see a summary of your endpoint configuration. This gives you a chance to review all the settings before making your endpoint live:
- The Endpoint Name shows your chosen name (email-test-A)
- The Version is set to 1 for your first deployment
Take a moment to review these details. When you're ready to go live, click the "Create endpoint" button.
Success! Your Endpoint is Live
Congratulations! Your endpoint has been successfully created and is now ready to use. You'll see a confirmation screen with important information about your new endpoint:
- Endpoint URL: The system provides you with a unique URL where your endpoint can be accessed. This is the address you'll need to share with systems that will send data to your endpoint. You can copy this URL by clicking the copy icon next to it.
- Version Control: Your endpoint is created as Version 1 and is automatically enabled. You can use the toggle switches to enable/disable it or put it in debug mode.
- Testing Your Endpoint: To verify everything is working correctly, click the "Try it out" button. This will take you to a testing interface where you can send sample data to your endpoint and see the results.
You can always return to the editing interface by clicking "Back to editing" if you need to make changes. Or, view all your endpoints by clicking "Endpoints list".

That's it! You've successfully created your first AireGlu endpoint that receives data and sends an email. Your endpoint is now ready to accept requests from your applications.

Check out the Endpoints section of the documentation for more details about the other available tasks and their configuration options. AireGlu offers many powerful task types that can help you build complex workflows for all your integration needs.